Showing posts with label Wordpress. Show all posts

1.20.2013

How To Change Blogger to WordPress – Part 4


This post is the fourth and final post in my series about converting from Blogger to WordPress. I have discussed installing WordPress locally, domain names and hosts, and plugins and themes.
In this post I will finish off with moving your blog to WordPress, pointing the two domain names to your WordPress blog, and then preventing Google from thinking your two domains contain duplicate content.

Importing from Blogger

Blogger to WordPress   Part 4
By this point you should have been developing your blog on you local copy of WordPress. Any testing should have been done using this blog, including plugins, and importing your Blogger data. Once you are ready to move, you should then do the following:
  1. Copy your theme up to your host using FTP. You can copy the entire theme directory in one shot to make life easier. Then log in to your hosted WordPress blog and select that theme.
  2. If you haven’t done so, copy up the plugins to your host and then activate any plugins you plan to use.
  3. If your Blogger blog receives many comments, then you can disable the commenting ability, temporarily, while you import your Blogger posts. This prevents you from missing any comments, and having you to import data twice.
  4. Import your Blogger posts and comments to your WordPress blog.
  5. Execute the Blogger plugin to change your permalinks to match your Blogger blog. Please read How To Change Blogger to WordPress – Part 3 for information on this plugin.
  6. If you have used Haloscan in the past for your comments, follow the steps to execute that plugin. Once again, please read How To Change Blogger to WordPress – Part 3 for information on this plugin.
  7. Load your blog to ensure your posts are displayed properly, and also ensure the permalinks match your Blogger posts.
  8. Once everything looks good, log in to your domain registrar, and point your www subdomain to your main domain (@). This will now allow visitors to access your blog using either the main domain or the www subdomain.
    When you change the settings for your domain, it can take a few hours for the changes to be updated in the system.
When you complete the above steps, you should now have your theme setup, all your Blogger posts and comments imported, and both the main domain and the subdomain pointing to your WordPress blog. You should also notice that your links from search engines, such as Google, will now take visitors to your new blog. Now that both domains point to one blog, how do we stop Google from thinking that one site is a duplicate of the other? We tell Google they are the same site.

Two Domains – One Blog

One concern webmasters, and bloggers have is the possibly of search engines picking up duplicates of their content. In our case above, we can easily prevent this using Google’s own Webmaster Tools. To do this use the following steps:
  1. If you haven’t already done so, sign up with Google’s Webmaster Tools. These tools can help you with monitoring your web site’s information pertaining to Google.
  2. Once you have signed up, login to Webmaster Tools.
  3. Select your blog from the list on the Dashboard.
  4. From the menu on the left, click Tools.
  5. Under tools, click Set preferred domain.
  6. Select one of the options, and then click the OK button.
  7. If you need to verify your blog, then follow the instructions provided. Once verified, Google will now think the main domain and the www subdomain are the same site.
You have now converted your Blogger blog to WordPress. You may want to stop search engines from indexing your Blogger blog to prevent duplicate content from appearing in the search engines. I would still keep your Blogger blog around in case you need some information from it.
Besides that, there isn’t a whole lot more to do, except sit back and enjoy your success. When you are bored with sitting back, go out and explore the many features and options available for your new WordPress blog.

Questions?

If you have any questions, or concerns, regarding the conversion to WordPress, feel free to contact me for assistance.


How To Change Blogger to WordPress – Part 3


In the first part I discussed installing WordPress on your local machine, and importing your Blogger posts into WordPress. From there, I talked about purchasing a domain name, and a host in part 2 of this series.
If you have been looking at WordPress on your local machine you have probably come across plugins and themes. You may have figured out what they are, but if you haven’t, I will discuss them in this post.

Plugins

Blogger to WordPress   Part 3
Probably the biggest advantage WordPress has over Blogger is the use of plugins. These are tools that you can download and install that are used to extend the functionality of WordPress. There are literally thousands of plugins that you can download to enhance your blog from an administrative or visitor aspect.
Installing plugins is extremely easy and can be installed with the following steps:
  1. Download the plugin to your local machine.
  2. Plugins are usually compressed in a file, so you will need to extract the file. Extract the contents to your local copy of WordPress into the /wp-content/plugins folder. The plugin will automatically create a new subdirectory within the plugins directory.
  3. You should now FTP the newly created plugin folder to your host in the same /wp-content/plugins folder. Some hosts allow you to extract the contents of a compress file, so you can instead upload the compressed (downloaded) file and then extract the contents on the host.
  4. Log in to your WordPress administrative panels and click Plugins at the top right.
  5. You should see a list of all plugins that you have installed. You must activate each plugin before it can be used. Scroll down until you see a list of Inactive Plugins.
  6. Find the plugin you want to activate, and then click the Activate link to the right. You should now be able to use the plugin.
There are many plugins available to download and use. Having too many plugins may slow down your blog, so it is important to only activate the plugins you will use.
With that said, here is a list of plugins that I am currently using:
Akismet. Blocks many of the spam comments and ping backs that can quickly fill up your blog. This plugin is included with the WordPress installation, so you can set it up and activate it easily.
All in One SEO Pack. Helps to populate the meta tags, page titles and other SEO related items on the pages of your blog.
Bad Behaviour. Keeps out spam bots and other black-listed machines from wreaking havoc on your blog. Works really well and I haven’t had a problem with it.
FeedBurner Feedsmith. If you use FeedBurner (you should be), then this plugin will help you redirect your WordPress feed to your FeedBurner feed.
Google XML Sitemaps. Generate a sitemaps.org compatible sitemap of your WordPress blog which is supported by Ask.com, Google, MSN Search and YAHOO.
MaxBlogPress Ping Optimizer. Saves your WordPress blog from getting tagged as ping spammer. Essentially, it prevents your blog from pinging various sites each time you make a small change to a post.
WP Super Cache. Very fast caching module for WordPress. This creates a static-HTML version of your posts to increase the speed of your site and reduce the processor usage on your host.
While the above is not a complete list, it does provide you with a good start to some of plugins that I found very useful.
You can view more information at WordPress Codex – Plugins.

Blogger Related Plugins
There are a few plugins that can greatly help you to convert from Blogger to WordPress. These plugins are not included in the list above because they can be deactivated and then deleted once they have been used. The author of the plugins has provided easy-to-follow instructions on using the plugins, so I won’t re-write them here.
Maintain Blogger Permalinks. Blogger truncates your post titles when it creates a permalink, WordPress doesn’t. This means that when you move from Blogger to WordPress, the permalinks won’t be the same for each post. This plugin will recreate the WordPress permalink to match the Blogger permalink so you won’t lose your traffic from the search engines and other web sites. I didn’t have any issue using this plugin.
Importing Haloscan Comments. If you have, or continue to use Haloscan you know that you can’t import Haloscan comments into Blogger. If you have exported those comments, however, this plugin will upload those comments into your WordPress blog so you won’t lose them. While this plugin didn’t import all my comments, it did import most of them.
By far the permalinks plugin is the most valuable as I have not missed a beat with regards to traffic from the search engines. Also, when I click on an old link to my blog from another web site, I am directed to the correct page on my blog.
Besides plugins, WordPress has a more flexible theme system, which I will discuss next.

Themes

One of the issues I had with Blogger is the way it handles themes. Blogger uses one template file to handle all the pages of your blog, whether it is your home, post, categories or archives page. All pages are rendered using the same template.
WordPress has broken each type of page into its own file. For example, the home page is index.php, and a post file is single.php. A theme includes all or some of these files to render a page to your visitors. For pages that are not included in a theme, the WordPress engine has a hierarchy structure it uses to determine the file to use in place of the missing file.
All themes are located in the /wp-content/themes folder, and can be installed in the same manner as a plugin, except you select the themes folder when extracting the files. Once extracted, use the following steps to use the theme:
  1. Log in to your WordPress administrative panels.
  2. From the menu at the top, click Design. A page that shows all the themes installed is displayed.
  3. Click the theme you want to use. A larger version of the theme should be displayed.
  4. Click the Activate “[theme name]“ link in the upper-right corner.
  5. Open your blog and check out your new theme.
While themes include many files, they are simple text files and can be edited. Once you edit a file, the theme will be updated to include any changes you have made. Be careful when editing a file, however, as any error can wreck the design of your blog, or produce errors. Ensure you always make a backup before making changes.
For more information on themes, please read WordPress Codex – Using Themes.

Testing

With regards to both plugins and themes, it is advisable to test them out on the copy of WordPress that is installed on your local machine. Once you are happy with a plugin or theme, you can FTP the files up to your host. For Blogger, I created a separate Blogger blog for development and testing, but for WordPress I can do it locally.
Remember to always backup your WordPress blog whenever you are about to make some changes. This way, if the changes don’t work, you can always restore from your backup and continue from where you had left off.
In my next post I will finish the Blogger to WordPress conversion, including how to have your two domains point to your WordPress blog, and get your search engine links to point to your new blog.

How To Change Blogger to WordPress – Part 2


This post will continue the steps that I took to convert my Blogger blog to a WordPress blog. In How To Change Blogger to WordPress – Part 1 I talked about installing WordPress on your local machine. This was done to help you learn WordPress and practice importing your Blogger data.
In this part I will talk about domain names and hosts, what they are and how they will be used during the conversion.

Domain Names

Blogger to WordPress   Part 2
When you want to visit a web site you would type in a URL in your web browser’s address bar. Behind the scenes, the browser will send of a request to another server to find out the IP address associated with that URL. The IP address is a series of numbers that uniquely identifies a server on the Internet.
The URL you entered into the address bar contains a domain name. The domain name is in the form [domain name].[extension]. For example, the domain name for Technically Easy is technicallyeasy.net. One of the reasons domain names are used is because they are easier to remember than a series of numbers, such as with an IP address.
Before you can host your own WordPress blog you will need to purchase a domain name. Domain names are not expensive ($4-$10/year), and are purchased on a yearly basis. You can pay for several years at one time if you choose. There are many registrars where you can purchase a domain such as GoDaddy.
If you have not already used a domain with your Blogger blog, I recommend you do so. It will make your conversion much easier later, especially if you would like to keep your backlinks.
From my experience in the past, it seems Google indexes Blogger blogs very quickly, probably because Google owns Blogger. With a domain name, your blog will be listed in the Google index with that domain name, instead of [blog name].blogspot.com. Once you point your domain name to your WordPress blog, the links in Google will now send the visitors to your new blog.
With the domain name you can also use that domain with both your Blogger and WordPress blogs at the same time. The last section on this page will explain how you can do that.

Hosts

While WordPress does offer a free hosting site, you will want to host your own blog for full control. In this case, you will need to find a host.
A host simply houses your blog on a server, and you pay a fee to use their services. Many hosts can also help you register a domain name if you wish, or you can use an existing domain name. For Technically Easy, I had registered technicallyeasy.net before signing up with a host, so I just pointed the domain to the host.
There are several well-known hosts including Host Gator and BlueHost. Keep in mind that there is no perfect host, and some people may have had a bad experience with one, while others may have had good experiences. Just ensure your host provides the ability to create a WordPress blog. Most hosts do.
Once you have chosen a host, you should now point your domain to the host’s server. You will also need to point your domain to your Blogger blog. One domain pointing to two blogs can be done.

One Domain – Two Blogs

First we will setup your Blogger blog to use your domain name. There is some information about setting up your Blogger blog to use your domain name here:
What you will do with your blogger blog is redirect it to www.[your domain name].com (change .com to the extension of your domain name). Follow the instructions in the second link above to change the www subdomain of your domain to point to your Blogger blog.
If you have questions regarding this step, let me know by sending me an e-mail, which can be found in the about link at the top of this page.
Now with your Blogger blog redirected to the www subdomain of your domain, we will now point your WordPress to the main domain, such as [your domain name].com. This will allow a visitor to view both blogs with one domain name. Your host should have instructions on how to change your CNAME records for your registrar.  If you having difficulty with this step, contact your host for assistance.
What will happen to the domain names once you convert to WordPress from Blogger? They will merge, as you will see in a future post.
By now you should have a domain name, a host, and two blogs. Next I will look at plugins and templates you can use with your WordPress blog, especially the plugins that will make your conversion much easier.

How To Change Blogger to WordPress – Part 1


I recently mentioned that I had converted to WordPress from Blogger. I also mentioned that the conversion was easier than I thought it was going to be. While I found it easy, some may still not be comfortable converting to WordPress from Blogger.
To ease any fears of converting, I decided to write several posts about converting from Blogger to WordPress. I will break down the conversion into several parts and discuss what actions are required to complete each part. In the end, I hope to help others make the conversion quickly, and easily.

Getting Started

Blogger to WordPress   Part 1
Before moving from Blogger to WordPress there are a few things that you will need:
  1. A local copy of WordPress for developing and testing. Although not necessary, I highly recommend installing WordPress on your local computer.
  2. A domain name that users will type in the browser to view your blog.
  3. A host to house your blog.
I will not re-write what others have done, but will rather point you to the resources that I had used to convert my Blogger blog to WordPress.

Installing WordPress on Your Local Computer

WordPress can seem complex, especially compared to Blogger. There are many files that make up a WordPress blog, and understanding how it all works takes time. This is one of the reasons that I suggest you install WordPress on your local computer.
Installing locally allows you to play around with WordPress without affecting your real blog. A local copy will allow you to install plugins, write and publish posts, try out new themes, and learn how WordPress works.
To install WordPress locally I suggest you follow the steps outlined in Test Drive WordPress Themes In Windows.
Once WordPress is installed, login into your administrative pages by using the following steps:
  1. Open your browser and navigate to: http://localhost/wordpress/wp-admin.
  2. Type in your user name and password and click Log In.
Once you have logged in you will see the Dashboard that displays a summary of information about your blog. Feel free to look around the administrative panel. Remember you are working on you local machine, so if you muck something up, you can easily start again.
A good resource to refer to when you have questions is the WordPress Codex. All information regarding installing, and using WordPress can be found there.

Importing Your Blogger Posts

One question you may have about moving to WordPress from Blogger is how to import your Blogger posts and comments. WordPress allows you to easily import your Blogger data into WordPress without affecting your Blogger blog. WordPress simply makes a copy of your data from Blogger, it doesn’t change anything in Blogger.
To import your Blogger posts and comments:
  1. Log in to your administrative pages in WordPress (see above for instructions).
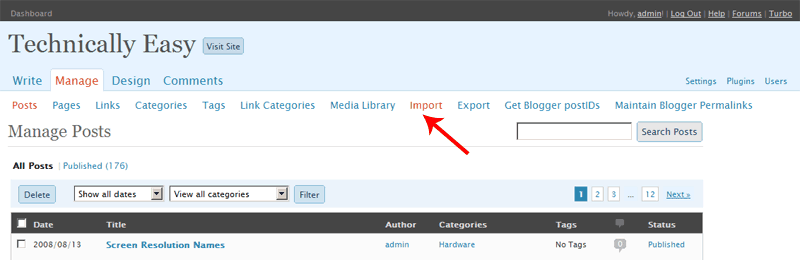
  2. At the top menu, click Manage.

  3. Blogger to WordPress   Part 1
    Click to enlarge (16KB)

  4. From the submenu, click Import.

  5. Blogger to WordPress   Part 1
    Click to enlarge (16KB)

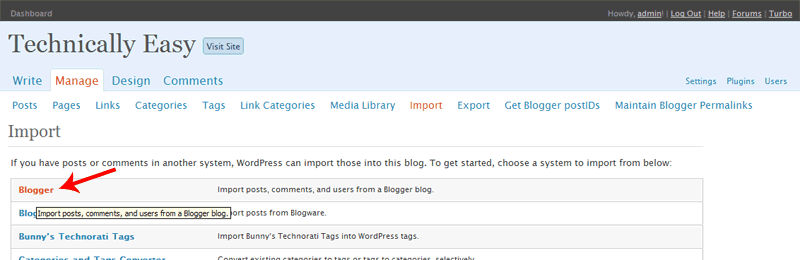
  6. In the list, click Blogger.

  7. Blogger to WordPress   Part 1
    Click to enlarge (18KB)

  8. Follow the directions on the screen to import your posts.
As mentioned, WordPress won’t change anything in Blogger, it will only retrieve your posts and comments. It will display a status bar of how much it has done. If you write another post in Blogger, you can import the new post and any comments into WordPress at any time. Remember you are still working locally, so if you make a mistake you can simply delete the posts and re-import them again.
You should continue to explore WordPress to become comfortable with using it. My next post will discuss domain names and how I used them to manage both my Blogger and WordPress blogs at the same time.

VPN App and VPN Plugin

Why a VPN app is always better than a VPN plugin If you want to use the internet privately and securely, then you need a VPN. But with a...